
|
This build was archived 15:10, September 11, 2010 (UTC), for the following reason:
This build had been designed for the following use: This build was in the category Great before being archived. |
This guide has been written for the 600hp Ritualist and Smiter build. The general walkthrough may apply to other builds, but a large portion of this guide refers to the usage of that build in particular.
Temple Of the Damned - Walkthrough[]
This walkthrough is written with Hard Mode in mind. If you're attempting this in Normal Mode, Spirit Bond is unlikely to trigger using the cheapest available forged armor and death is likely.
When doing Cathedral of Flames in Hard Mode, you will need to take an additional hero or person with some healing. Some of the Undead will spam Reversal of Damage and your Smite Bonder will die very quickly. Use either the 3 Man Variant or even just bring another hero with Glimmer of Light, Vital Blessing, and Life Attunement.
Level 1[]

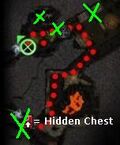
First Level Map
- There will be a stationary group of undead with a patrolling group behind it and a patrolling group of Charr to the left. Dispatch the stationary group.
- Take a left, following the group of patrolling Charr.
- Normally, the group of 3-4 charr that will patrol away from you will get killed by a group of 5 undead. If this doesn't happen, kill the charr as they come back along their patrol pattern.
- As you follow the patrol pattern of the Charr, you'll see a large rock. The group of undead mentioned in the previous step will be patrolling behind this. Kill them.
- You should see a doorway leading out of this room. There will be a group of undead patrolling along the corridor that leads to the next room and a group of charr patrolling north-south outside this doorway. You must kill the undead, but the Charr are optional; you can sneak past them easily.
- At the end of the corridor, there will be a group of patrolling undead that must be killed.
- The corridor leads into a massive dining hall area. Turn immediately left and you should see a group of allied Charr. They will turn hostile when you approach them, so make sure you have your defensive enchantments ready. Especially important is Spell Breaker since the Charr boss has Shatter Enchantment. You may need to use Shield of Absorption for this group.
- Kill them,pick up the dungeon key, and use it to open the dungeon lock.
- There will be a patrol group that should not be aggroed. Once you cross the threshold of the newly opened doors, a group of undead will appear and move to where the Charr boss was. Be ready and kill these undead before aggroing the group that patrols.
- Once you've killed the group that patrols and moved down to the Beacon of Droknar, there will be two groups of patrolling undead that you will be able to see. You can kill them separately or at the same time if you feel brave.
- The The Keeper and his group are fairly easy to kill. Use Shield of Absorption with this group since their attacks will quickly use up Spirit Bond. Do not be surprised if you see two small groups of undead pop up on either side of him. After killing him, move into level 2.
Level 2[]

Second Level Map
- Sometimes there is a single Charr Axemaster or Charr Blademaster that needs to be killed. Most of the time, the group of patrolling undead has already done it.
- There are two groups of undead that are patrolling around a large rock. Kill them both (one group at a time if you need to).
- To the right, past another large rock, there will be an allied group of Charr protecting the area map. Killing them is optional; you should be able to turn to your left and sneak past their group towards a doorway.
- A group of enchanted weapons will patrol back and forth up to the doorway. Use Shield of Absorption when killing this group as they can quickly use up Spirit Bond. You shouldn't need Spell Breaker for this group; they are all melee.
- The next area is full of poison jets and geysers. Be careful when moving around. To your right will be a dead end and to your left, around the corner, will be another group of patrolling enchanted weapons. Spell Breaker is not needed, but make sure to use Shield of Absorption.
- To move around the poison jets and geysers you will need to move around the right side of the room. A group of undead will appear when you do this so be sure to have Spell Breaker on you and your enchantments ready.
- There will be another group of enchanted weapons patrolling back and forth into the poison jets and geysers. Kill them. Spell Breaker won't be required, but Shield of Absorption should be used.
- Once they're dead move towards the doorway leading out of this area. There will be sometimes be another lone Charr Axemaster or Charr Blademaster that you will need to kill. Most of the time, the undead group in the next room have already done this for you.
- Go through the door and move to your right. There will be a group of undead patrolling. They will usually engage a group of patrolling Charr and kill them. If there is a Charr Mender in the group of Charr, it might be best to wait for this to happen.
- Once both groups are dead, continue on following the wall to the right. There will be a Beacon of Droknar on the far side of the room, a hanging cauldron dripping molten lava to your right, and a very steep hill leading to an archway on your left. At the top of this small, but steep hill is a Charr Dungeon Key boss like you encountered in the dining hall on Level 1.
- Do the same thing you did for the other dungeon key boss. If a Charr Mender lives, grab the dungeon key and open the dungeon lock. Once you cross the threshold of the newly opened door, an undead group with a boss in it come running up to you. Lure them back and let them kill the Charr Mender.
- If there is no Charr Mender, just continue with opening the lock and killing the undead boss's group. This group is entirely melee so you won't need Spell Breaker but you will need Shield of Absorption.
- Down the slope and into the next room are four groups: 2 Undead groups, 1 Enchanted Weapon group, and another group with the boss for this level, The Master.
- The first group of undead patrols along the left side of the slope. Kill them.
- The second group of undead patrols about near the bottom of the slope. Kill them, too.
- The enchanted group will patrol on the far left side of the map. They can and should be avoided.
- The Master's group is similar to The Keeper's group on the first level. You will need Spell Breaker and Shield of Absorption.
- Proceed into level 3.
Level 3[]


Third Level Map
- Upon entering the area, you will see a Keymaster of Murakai. Just ignore it. It will stare at you for a couple seconds and then wander off unless you attack it.
- There will be two groups of undead patrolling to your left. You only need to kill the one that patrols along the wall to the extreme left.
- Follow the wall on your left and you'll come to a doorway which leads into a large hall full of burning trees and about 5 groups of enchanted weapons. Don't enter this room. There is a small passage immediately to your right which you should go down. At the end of this passage, there is a group of undead you must kill.
- After killing that group, follow the wall around to your left. There is a large crack in the ground full of liquid magma. Continue to follow the wall until you can cross over this crack.
- Turn right and follow the crack back down and there will be a patrolling group of undead. Kill them. The Keymaster of Murakai will be behind them up a steep hill that leads to another beacon of Droknar.
- Go back down the steep hill and move to your right. Move east through a small doorway and there will be a small group of undead just after. Kill them.
- Continue along the passage past some pillars and turn right. Just ahead of you will be a group of enchanted weapons patrolling up and down a ramp and across the path ahead. You can either avoid them or kill them. If you decide to kill them, remember to use Shield of Absorption.
- As you continue down the corridor, there will be another group of enchanted weapons. Remember to use Shield of Absorption and kill them.
- You will see the dungeon lock directly in front of you at the end of the passage. Open the lock.
- Head towards Murakai's Steward who is standing atop the massive mound of earth in this room. You will need Spell Breaker and Shield of Absorption on yourself. Be aware that there undead will pop up out of the ground and attack you too. Be sure to grab the Boss Key as soon as Murakai's Steward dies. Once Spell Breaker begins to run out, make a retreat. If you weren't able to grab the key (or any other drops you wanted), then have your Smite Bonder reapply Spell Breaker and go back in. You need the Boss Key to proceed.
- Exit the Murakai's Steward's chamber and take the first two left, going down the ramp. At the bottom and to your left you will notice a small tunnel. There is a group of undead that patrol just inside the tunnel. Kill them.
- At the end of the tunnel, there will be a group of undead that patrol just outside the tunnel. Kill them.
- As you exit the tunnel and turn right, you will be on the edge of an area full of Flame Dart Traps.
- The 600 rit can (and should) maintain Spirit Bond on himself and one of the heroes and Protective Spirit on the other hero. To the left you should see a set of stairs with a flame jet at the bottom. To the left of the flame jet there is a smaller staircase leading up to the middle of the main staircase. Use those steps to circumvent the flame jet and reduce the damage you will take.
- Move as zig-zaggy as possible to reduce the number of darts hitting your party. Pause for a moment to let the healer top up the red bars on anyone who has taken too many hits.
- At the top of the stairs, there is another flame jet. If it is shooting flames, continue to move about randomly avoiding the darts. Once you get past this jet, you will be safe from the flame darts.
- The group will now be outside Murakai's chamber. Open the dungeon lock and move to your left. There is a flame just just inside the door on the ground. Be careful to avoid it.
- You will be standing next to a Beacon of Droknar. From here you can either go around the left or the right of the flame pit. Either way there are two groups of undead to kill. They do not require Spell Breaker, but may require Shield of Absorption. The first group will be just at the edge of the flame pit. The second will be just on the other side of the small bridge leading to Murakai.
- While facing Murakai, cast Spell Breaker before aggro. Maintain Prot Spirit, and Spirit Bond. Use VwK on recharge. She will summon Servants of Murakai regularly. You will see them appear and stand there for a few seconds so you have plenty of warning. Shield of Absorption will help reduce any pressure the Servants may apply to you. Vengeful Weapon will speed up Murakai's death.
- Just continue to maintain your enchantments and VwK. You may want to refresh Spell Breaker when it recharges. When Murakai is dead, collect the chest reward.
- After Collecting Chest, you may kill the remaining undead, as they still drop gold items and crafting materials.
- /resign and collect your reward from the Charr merchant. If you want to repeat the dungeon, you need to leave Doomlore Shrine and reenter. You can also change to another district. If you don't do this, the merchant will not offer you the quest.
Hidden Chests[]
- Hidden Chests can really boost the money made on the run. Lockpicks, additional gold, and rare crafting materials (such as Sapphires, Onyx Gemstones, and Rubies) accumulated from these chests can double or triple your income.
- For level 2, in the lava pit where there are 2 chests, be aware that there are a lot of spiders that pop up in this area. You do not need Spell Breaker for them, but be aware that they will try to interrupt your skills.
- If you happen to find a Dwarven Ghost, this shouldn't cause a problem. They will almost never draw any aggro.
- For level 3, first chest upon entrance has a glitch where it will not appear. It has been suggested that if you clear out the mobs of undead, the chance the chest will glitch is reduced significantly.

Level 1 Hidden Chests


Level 2 Hidden Chests


Level 3 Hidden Chests
| Level | Item | Notes |
|---|---|---|
| 1 | near the area map behind the patrolling group of undead at the start | |
| 1 | close to the table near fireplace in the Dining Hall | |
| 1 | Hidden Treasure | (2x) Between 2nd an 3rd column, near wall on either side of the room in the Dining Hall |
| 1 | Hidden Treasure | By Beacon of Droknar across the room from the Dungeon Gate in the Dining Hall |
| 1 | Hidden Treasure | In the room with The Keeper. Follow the wall around to the right into the dead end. |
| 2 | Hidden Treasure | (2x) close to each other, from the start turn left and head north |
| 2 | Hidden Treasure | just north of the area map |
| 2 | Hidden Treasure | (2x) in a lava pool, just north of the dungeon lock |
| 2 | Hidden Treasure | in a lava pool, just south of the dungeon lock |
| 3 | Hidden Treasure | Near the start. Commonly glitches and does not appear. Rumors say to try killing the mobs of undead first. |
| 3 | Hidden Treasure | In the area with the burning trees, just past the first tree on left side as you come in from the start of the level. |
| 3 | Hidden Treasure | At the far end of the area with the burning trees. |
| 3 | Hidden Treasure | Near the second Beacon of Droknar and the Keymaster of Murakai. Sometimes there are two in this area. |