
|
This build was archived 11:29, 23 May 2020 (UTC), for the following reason:
This build had been designed for the following use: This build was in the category Good before being archived. |
| |
This team requires mercenary heroes. |
Z-Way is a team build that takes full advantage of the heroes A.I.'s skill management capabilities, making sure that every skill in their respective set is utilised to full potential allowing for a team that can take on All: NM and HM dungeons, 6-8 party Vanquishing and Missions, FoW, War in Kryta, Winds of Change, World Bosses, Urgoz, The Deep, DoA, the Underworld and AFKing multiple high-end areas. You can also AFK: Zos Shivros Channel (HM), Glint's Challenge (NM), Mallyx Citadel (NM / Gem Farm), Gate of Madness L-Survivor (HM) and Abbadons Gate L-Survivor (HM).
Overview[]
|
| ||||||||||||||||||
|
| ||||||||||||||||||
|
|
OR |
| ||||||||||||||||
|
| ||||||||||||||||||
|
| ||||||||||||||||||
|
| ||||||||||||||||||
|
|
ST Ritualist[]
Creatures you create have 56% more Health, and weapon spells you cast last 56% longer.  Template code |


![]() Optional should be:
Optional should be:
Equipment[]
- Full Blessed Insignia or Survivor Insignia.
- Full Vitae.
- Highest Vigor you can afford.
- 40/20/20 +1/20% Spawning Power Staff (Adept Spawning Power staff Staff Wrapping of Mastery with "Aptitude not Attitude" inscription)
- Optionally: Shield or off-hand set with Spear of Enchanting (Spear of Enchanting with "I have the power" inscription + Shield of Fortitude with +10AL inscription or Spawning Focus of Aptitude with "Master of My Domain" inscription)
Variants[]
- See Rt/any ST Hero
Resto Necromancer[]
12 + 1 + 1 Gain 14 Energy whenever a non-Spirit creature near you dies, up to 3 times every 15 seconds. Template code |


![]() Optional 1&2 should be:
Optional 1&2 should be:
Equipment[]
- Full Herald's Insignia or Survivor Insignia.
- Full Vitae.
- Highest Vigor you can afford.
- Rune of Vitae on chest, Superior Vigor on hands and Rune of Attunement on legs and feet
- 40/20/20 +1/20% Restoration Staff (Adept Restoration staff of Mastery with "Aptitude not Attitude" inscription)
- Optionally: Shield or off-hand set with Spear of Enchanting (Spear of Enchanting with "I have the power" inscription + Shield of Fortitude with +10AL inscription or Restoration Focus of Aptitude with "Master of My Domain" inscription)
Variants[]
Emo Elementalist[]
Your maximum Energy is raised by 48. Template code |


Equipment[]
- Full Blessed Insignia or Survivor Insignia.
- Full Vitae.
- Highest Vigor you can afford.
- 40/20/20 +20% Enchanting Protection Staff (Adept Protection staff of Enchanting with "Aptitude not Attitude" inscription
Variants[]
- See E/Mo Prot Hero
Dom Mesmer x2[]
You activate Spells and Signets 28% faster. (No effect for non-Mesmer skills with a cast time less than 2 seconds.) In PvE, the recharge time of your Mesmer Spells is reduced by 21%. Template code |


![]() Optional 1 should be:
Optional 1 should be:
![]() Optional 2 should be:
Optional 2 should be:
 Shatter Hex
 - Shatter Enchantment
- Wastrel's Demise or Wastrel's Worry
- Chaos Storm
- Drain Enchantment
- Leech Signet
- Hex Eater Signet
- "Stand Your Ground!"
- "Never Surrender!"
- "Can't Touch This!"
![]() Optional 3 should be:
Optional 3 should be:
Equipment[]
- Full Blessed Insignia or Survivor Insignia.
- Full Vitae.
- Highest Vigor you can afford.
- Shield or off-hand set with +30hp and +5e Spear (Spear of Fortitude with "I have the power" inscription + Shield of Fortitude with +10AL inscription or Domination Focus of Aptitude with "Master of My Domain" inscription)
- Optionally: 40/20/20 +1/20% Domination Staff (Adept Domination staff of Mastery with "Aptitude not Attitude" inscription)
Variants[]
Inepti Mesmer x2[]
You activate Spells and Signets 37% faster. (No effect for non-Mesmer skills with a cast time less than 2 seconds.) In PvE, the recharge time of your Mesmer Spells is reduced by 30%. Template code |


![]() Optional should be:
Optional should be:
Equipment (Both Mesmers)[]
- Full Blessed Insignia or Survivor Insignia.
- Full Vitae.
- Highest Vigor you can afford.
- Shield or off-hand set with +30hp and +5e Spear (Spear of Fortitude with "I have the power" inscription + Shield of Fortitude with +10AL inscription or Illusion Focus of Aptitude with "Master of My Domain" inscription)
- Optionally: 40/20/20 +1/20% Illusion Staff (Adept Illusion staff of Mastery with "Aptitude not Attitude" inscription)
Variants[]
Usage[]
General[]
The 3 forms of ZWay are foolproof in almost all situations, provided that the player can correctly flag his heroes in difficult situations (such as large mobs, patrolling groups and heavy AoE). It is worth noting that this build lacks some of the most popular and traditional builds such as Spirit Masters, Minion Masters and highly armoured melee characters to back up the lower armoured characters (except when using DPS). This causes considerable survival problems and may immediately make the build appear weak or dysfunctional. This can easily be countered as the strength of this entire team composition relies on an easy-to-understand flagging structure that requires you to put the supportive classes and yourself as healer (except Z-DPSWay) at the back, and the damaging/interrupting mesmers at front. Failure in doing this can easily get your team wiped in seconds. The next section will explain in detail how to set up heroes and prevent any risk of high pressure or heavy AoE-damaging.
Do note that you can auto-pilot with your heroes most of the time. The flagging structure is only recommended in dire situations.
Team Usage[]
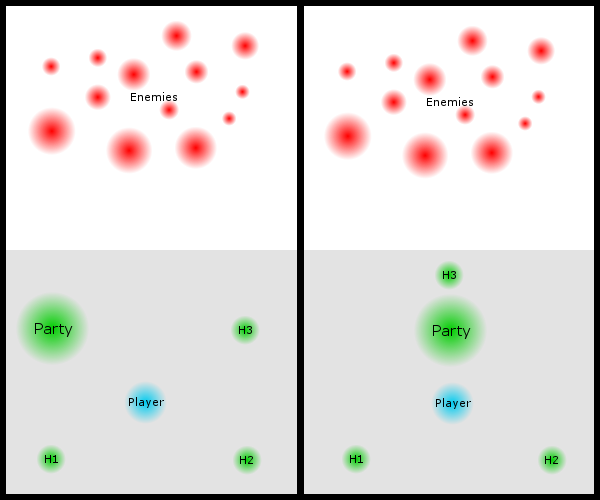
The trick to stay alive is to flag both the Soul Twisting Ritualist (H1) and the Icy Veins Necromancer (H2) at the back of the party by making them stand across each in approx. area/earshot distance. Whatever hero you place third (H3) should be the tanking hero if you are a healer (Z-Way and Z-Mercway). Set the hero to ![]() Fight mode.. This will, in combination with CTRL + Space, make the hero run first and thus draw many powerful spells and attacks from foes before they have a chance to strike the rest of the team, making him/her an excellent tank.
Fight mode.. This will, in combination with CTRL + Space, make the hero run first and thus draw many powerful spells and attacks from foes before they have a chance to strike the rest of the team, making him/her an excellent tank.
The rest of the party will automatically use the correct spells at maximum efficiency, allowing you to heal peacefully and keep the team alive while they are dispatching hordes of foes with relative ease.
When running Z-Way as DPS you can take the role of tanking yourself by switching your position with H3 and drawing enemy groups to your team. Run into enemies early and build up adrenaline or energy to maintain whatever supportive skills, spells, chants or shouts you have, allowing your team to have a constant armour boost (i.e. "Save Yourselves!").
Either ways, it's important to keep this flag-structure in mind, especially when facing larger mobs. It is not always required to micromanage Z-Way heroes if you understand what kind of foes you are facing, but a general rule of thumb is that if you are in doubt, or if you have no idea what profession foes have, use this structure to safely keep your heroes out of nearly every possible risk (such as heavy AoE, traps, heavy physical damage, monster skills etc).
It's recommended to keybind the first 3 skills of the Soul Twisting Ritualist to quickly spawn the spirits at your convenience.
Counters[]
- Failing to flag the team composition correctly (Not spreading out, letting the Emo die first, tanking incorrectly)
- Extremely heavy caster hate (Interrupts, daze)
Notes[]
- If you are not taking an Emo with you, consider changing the Blessed Insignia's to the Heroes highest armour Insignia (linked to their profession).
- Consets are almost never required unless running the Underworld or Domain of Anguish in Hard Mode.